
When I edit data on an Account or an Opportunity (or any record type, really), I spend a lot of time in the “related items” area. I scroll, wait for the page to catch up to me, click, wait for the related item to load, grab the information I need, and (finally!) go back to the account record. Ugh! Here’s a better way to tackle multiple object editing.
Edit Related Items Without Leaving the Salesforce Record Detail Page
Instead of this relatively painful and slow process, I use GridBuddy to embed grids onto my record detail pages. This allows me to create and edit related items without ever leaving that record. For example, on an Account, I’d like to have quick and easy access to all related Contacts, Opportunities, Cases, Use Cases, Licenses, and more. I want to edit them in-line, create new records, and have them auto-associate with the Account I’m on. And I want to click save just once, when I’m done with all of my work.
3 Easy Steps for Multiple Object Editing
In three steps, you can make this happen with GridBuddy embedded grids. Try it out with your free trial of GridBuddy from the Salesforce AppExchange!
Step 1: Create the Grids You’d Like to Embed
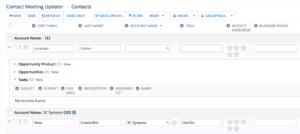
For example, create a Contact grid, perhaps with the capability of creating related tasks auto-associated with each Contact:
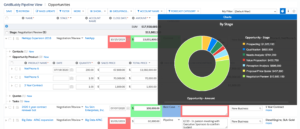
Create an Opportunity grid with Opportunity Products built in as a “child“:
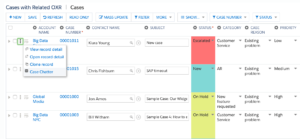
Create a Case grid and filter to show “open” cases by default, and add an action to open the Chatter for each case in a popup window:
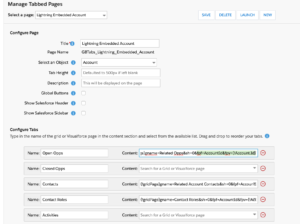
Step 2: Create a GridBuddy Manage Tabbed Page
Once these grids are created, put them together in a GridBuddy Manage Tabbed page. Add filter parameters to each grid so that they automatically filter their data to only show records related to the Account page. The order is defined by top to bottom = left to right. Drag them up or down until they’re in the exact right order.
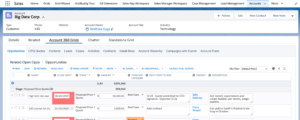
Step 3: Embed the Grids Onto the Record Detail Page
The last step is to edit your Account record (or whatever record you’re working on) and embed the tabbed page of grids. If you are in Lightning, embed the “GridBuddy Tabbed Page” Lightning Component (learn more with this video). In Classic, embed the Visualforce Page for the Manage Tabbed Page (here’s a video with more details).
Once the grid is embedded, all you have to do to create new related records is click the “new” button at the top of each grid. Existing related records will appear in the grid and you can edit each field based on your Salesforce permissions – all without leaving your Account record.
Like this simple way to streamline multiple object editing? Let us show you more in a demo. Contact us to schedule one.
GridBuddy Streamlines Sales Processes
GridBuddy streamlines the way CRM admins, sales teams, and other users work with CRM data in Salesforce. Easily configure grids and charts to enable your Salesforce users to manage all the data they need from one screen, across multiple objects, with only the fields and records that are relevant for the task at hand. Or use pre-configured ReadyGrids – We added 18 new Validity ReadyGrids to the Grids dropdown this month! Learn more here.