

A lot of Salesforce Admins have downloaded an app or two from the Salesforce AppExchange, but deleted those apps once they realized the level of effort required to get them up and running. Not so with GridBuddy. You can get this app installed, assigned, and ready for use in ten minutes or less, and I’m going to show you how.
Simple Steps to Getting Started with GridBuddy
GridBuddy streamlines complex CRM processes, providing all the data you need to work with in a single, editable grid. Considering how it’s designed to boost sales productivity from day one, it’s no wonder it makes even installation and getting started easy.
Follow these simple steps and you’ll be up and running in no time. (See if I’m exaggerating: Download GridBuddy from the Salesforce AppExchange and see how fast you can follow these steps.)
Step 1: Install the App
The first thing you need to do is install the GridBuddy app from the AppExchange here. Click get it now to install the GridBuddy app into the org of your choice.
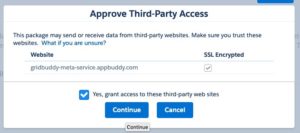
Next, you will will see a message to approve third-party data access. GridBuddy has a Heroku-hosted service to ping the Salesforce Meta Data API in order to render dependent picklists and lookup filter definitions on the grid. Rest easy knowing that GridBuddy does NOT transmit or store any production data outside of your org to this or any other service.
Select yes and click continue.
Step 2: Grant Permissions
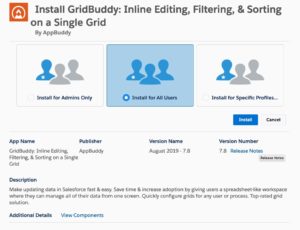
The next thing you’ll do is select Install for All Users or Install for Specific Profiles.
- Install for All Users will grant GridBuddy permissions to all profiles. With this option, you will not need to manually configure your profiles or permission sets to make GridBuddy visible, and you won’t need to manually set up Grid and Grid Wizard access. So, Install for All Users is the way to go.
- Install for Specific Profiles will allow you to grant GridBuddy permissions to individual profile combinations. Those profiles will also not require additional access configuration. This is a fine choice to make, but it may take a bit longer than 10 minutes to make the app visible and set up access to each required profile. Check out our detailed instructions in the GridBuddy Getting Started Guide.
Some notes regarding this step:
- Don’t worry: A user can only access the GridBuddy application after being assigned a license (by you, in the next step). If a user is not assigned a license, they will not see the GridBuddy application.
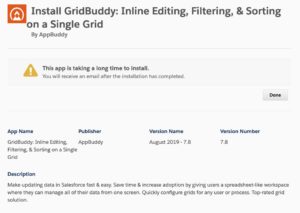
- After you click install, you might see a message that reads “This app is taking a long time to install.” This is normal. Click done and then go to Salesforce Setup. Check your installed packages; you’ll see GridBuddy here within a minute or two.
Side note: Installed Packages is also where you can check what version of GridBuddy you are on (new versions available from the AppExchange every month or so), and assign GridBuddy licenses to your users. You’ll have 10 licenses as part of your free trial.
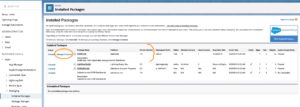
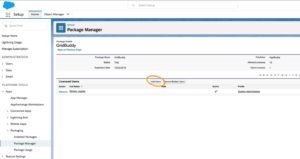
Step 3: Give Users Their GridBuddy Licenses
Last step! Stay where you are, in Setup > Installed Packages. Click the manage licenses link to open the GridBuddy Package Manager. Click the add users button to see a list of available users, and check the box beside each user who is lucky enough to get one of your precious GridBuddy licenses.
Some notes regarding this step:
- GridBuddy licenses are 1:1, one license per assigned user, unless you purchase a site license, which can mean unlimited users. A site license also means you can skip this step.
- If you are installing GridBuddy in a Salesforce Sandbox – the manage licenses link will not appear, and access to GridBuddy will be controlled only based on the profile permissions.
That’s How Easy It Is When Getting Started with GridBuddy
You’re done! Did that take 10 minutes or less? (Not counting when you stopped to check your email.) You and your assigned users are now ready to use GridBuddy.
You don’t have to configure anything else, because ReadyGrids (pre-packaged grids) are available for immediate use. Simply go to the app launcher and type in “grid.” Select Grids and you will immediately see a grid, fully populated with your Salesforce data, and ready for some speedy inline edits. Click the dropdown menu at the left to see all the other ReadyGrids that are ready for you to use. No setup needed.
If you’re a GridBuddy Admin, you’ll have access to the Grid Wizard tab (or the more menu within a ReadyGrid) where you can create new grids or make changes to existing ones. As an admin, you can also access the Grid Wizard from the app launcher to create new grids from scratch, clone existing ones, or just modify one of the ReadyGrids to meet a custom need.
Now that you’ve got GridBuddy installed, it’s time to see what all those five-star AppExchange reviews are all about.